

Getting cold therapy right starts with getting the fit right. A hip ice wrap that slips, bunches, or fails to make full contact with your skin delivers weaker relief and can even cause discomfort. Whether you are recovering from hip replacement surgery, managing bursitis, or icing after a tough workout, a snug and secure wrap makes all the difference. Below you will find a complete, step-by-step walkthrough for fitting Cool Relief's Soft Gel Hip Ice Wrap so you can enjoy hands-free, targeted cold therapy every time.
Why Proper Fit Matters for Hip Cold Therapy
Cold therapy is the practice of applying controlled cold to an injury or surgical site to reduce swelling, slow nerve impulses, and promote healing. When a hip ice wrap fits correctly, the gel pack maintains even contact with the target area, maximizing thermal transfer and pain relief.
A poorly fitted wrap shifts during movement, creates pressure points, and allows warm air gaps that weaken the cooling effect. According to the American Academy of Orthopaedic Surgeons, consistent contact between a cold source and the skin is essential for effective cryotherapy. Getting the fit right is therefore not optional; it is the foundation of effective treatment.
What Is Included in the Cool Relief Hip Wrap
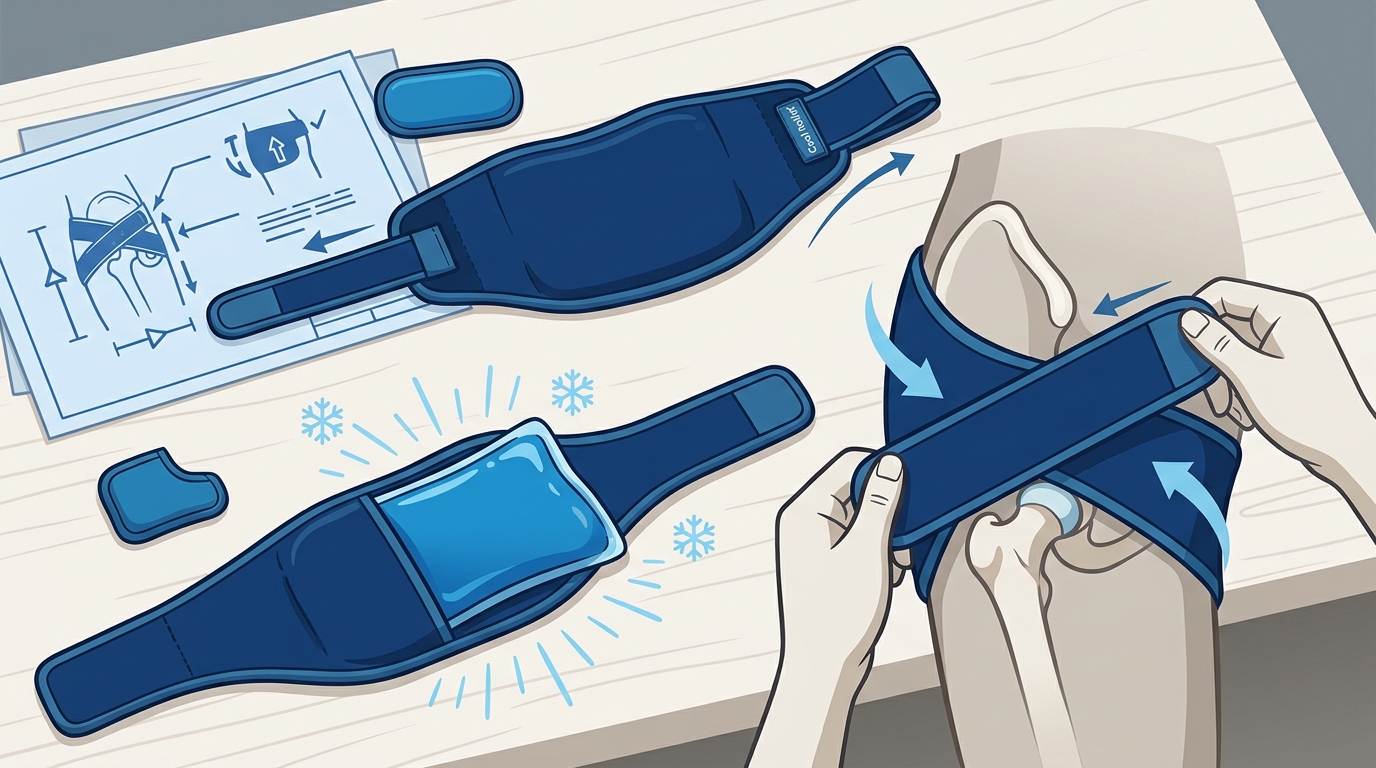
The Cool Relief Hip Ice Wrap ships with two main components: a professional-grade soft gel cold pack and a cloth compression cover with adjustable straps. The gel pack is a sealed, non-toxic insert that stays fully soft and pliable even when frozen. The cloth cover is a fabric sleeve designed so you can apply the wrap directly to your skin without a towel.
Two straps handle the securing: a short thigh strap and a long adjustable waist strap with hook-and-loop (Velcro) fasteners. The universal design works on both right and left hips and accommodates waist sizes from S to XXXL.
Preparation: Freeze, Position, and Check
Freeze the Gel Pack Properly
Place the gel pack in your freezer for a minimum of two hours before use. Cool Relief gel packs do not require plastic bags or special storage; simply lay the pack flat so it freezes evenly. Because the gel never absorbs freezer moisture, you can store it in the freezer indefinitely until needed.
Choose Your Position
Decide whether you will be sitting, standing, or lying down during your icing session. The wrap is designed for all three positions, but knowing your position in advance helps you route the straps correctly the first time.
Inspect the Straps
Before every session, check that the Velcro surfaces are free of lint and debris. Clean hook-and-loop fasteners grip more securely and extend the life of your wrap.
Step-by-Step Fitting Guide
1. Insert the Gel Pack and Place the Wrap
Slide the frozen gel pack into the cloth cover pocket. Center the gel pack over the area of your hip that needs treatment, whether that is the outer joint, the front of the hip, or slightly toward the lower back.
2. Secure the Thigh Strap
Take the short attached strap and wrap it around your upper thigh. Press the Velcro onto the blue material of the wrap and adjust to your desired compression. This strap anchors the bottom of the wrap and prevents it from riding up.
3. Secure the Waist Strap
Route the long adjustable strap around your waist. Fasten the Velcro on each side of the blue wrap and tighten to your preferred compression level. The waist strap holds the gel pack firmly against your hip and distributes pressure evenly so you can move freely.
Once both straps are fastened you should be able to walk, sit, or shift positions without the wrap sliding. If it moves, re-tighten incrementally until it holds.
Fit Comparison: Common Mistakes vs. Correct Technique
| Common Mistake | Correct Technique | Why It Matters |
|---|---|---|
| Securing waist strap first | Secure thigh strap first, then waist strap | Thigh strap anchors the wrap; reversing order causes slipping |
| Wrapping over bulky clothing | Apply directly to skin or thin layer | Thick fabric blocks cold transfer |
| Over-tightening both straps | Snug but comfortable compression | Excessive pressure can restrict circulation |
| Using a partially frozen gel pack | Freeze for at least 2 hours | Partial freeze means shorter, weaker therapy |
| Ignoring strap Velcro buildup | Clean lint from Velcro before each use | Dirty Velcro loses grip and the wrap loosens |
Fitting for Different Use Scenarios
Post-Surgery Recovery
After hip replacement or arthroscopic surgery, range of motion is limited. Have a caregiver help position the wrap while you lie on your unaffected side. Icing after surgery is recommended by medical professionals to reduce pain and swelling, so a secure fit during rest is critical. Explore Cool Relief's hip ice pack pain relief guide for more recovery tips.
Athletic Recovery
Athletes can wear the wrap while walking or stretching post-workout. The hands-free design lets you continue your cool-down routine without holding an ice bag in place. If you also need to ice other areas, Cool Relief offers wraps for the knee, shoulder, and thigh and calf.
Everyday Pain Management
For chronic conditions like hip bursitis, you may ice several times a day. A compression ice wrap is a reusable cold therapy device that combines targeted cooling with gentle pressure. Store your gel pack in the freezer between sessions so it is always ready. Visit the Why Cool Relief page to learn how the proprietary gel formula stays colder longer than standard packs.
Key Takeaways
- Always freeze the gel pack for a minimum of two hours before applying.
- Secure the thigh strap first, then the waist strap, for a stable, slip-free fit.
- Apply the wrap directly to skin or over a very thin layer for maximum cold transfer.
- Adjust compression to snug but comfortable; avoid over-tightening.
- The universal design fits waist sizes S through XXXL on either hip.
- Clean the Velcro fasteners regularly to maintain a strong grip.
- The wrap works while sitting, standing, or lying down for true hands-free therapy.
Frequently Asked Questions
How long should I wear the Cool Relief hip ice wrap per session?
Most healthcare providers recommend 15 to 20 minutes of cold therapy per session. Cool Relief gel packs can stay cold for up to two hours, but you should follow your doctor's guidance on duration, especially after surgery.
Can I use the hip wrap on my left and right hip?
Yes. The universal design works on both sides. Simply reposition the wrap and re-secure the straps.
Will the wrap fit larger body types?
The long adjustable waist strap accommodates sizes from S to XXXL. If the thigh strap feels snug, position it slightly lower on the thigh where circumference is smaller.
Can I use the gel pack for heat therapy too?
Yes. Remove the gel pack from the cloth wrap and warm it in hot water or a microwave. Then reinsert it for soothing heat therapy on sore muscles.
Do I need a towel between the wrap and my skin?
No. The cloth compression cover is designed to be applied without a towel. It insulates just enough to protect your skin while directing cold toward the hip.
How do I clean the wrap?
Hand-wash the cloth cover with mild soap and air dry. Wipe the gel pack with a damp cloth. Do not machine wash or put the gel pack in a dryer.
Does Cool Relief offer a warranty on the hip wrap?
Yes. All Cool Relief ice wraps and cloth coverings come with a six-month warranty against defects. Contact customer service at 1-800-475-1609 or email customerservice@coolrelief.net for replacements.
How quickly will my order arrive?
Orders ship via FedEx 2-Day or Priority Mail with free Saturday delivery. Most orders arrive within three business days of shipment. Orders over $25 qualify for free shipping.
Get Your Hip Ice Wrap Today
Ready to experience hands-free hip cold therapy that actually stays in place? Visit the Cool Relief Hip Ice Wrap product page to order yours now. With fast nationwide shipping from Oklahoma City, a six-month warranty, and 30-day free returns, there is zero risk in trying the wrap trusted by hospitals and surgical centers across the country.